Sunday 3 November 2019

Three months since my last post ..so what's been going on ?


To paraphrase "Scale model soup " - blimey, I can’t believe it’s been more than three months since my last post! Time sure flies, especially as you get older. Suffice to say, I’m still here. So what’s been going on? On the basis that you might be vaguely interested....here goes..

 Since my last post here..I've written two books ! And a publisher is interested! Here's a mock up of the cover of the first one - doesn't take a great deal of effort to work out what the second title might be either. Of course these titles weren't compiled overnight - they are the synthesis of about ten years work on various projects..


Ok so you're thinking same old, same old..but both titles are jam-packed with great photos from a number of Luftwaffe alumini and artworks by Vincent Dhorne. And no-where do I say that Hartmann was credited with 352 kills or that Walther Dahl managed 128 victories including 36 heavy bombers...

In the same series I collaborated with Jean-Louis Roba on this next title earlier in the year and it is now available from the usual sources!


Features first person accounts, artworks, 200 photos, nice thick glossy paper and glossy card cover.

Elsewhere Eduard's new Bf 109 G-6/AS is released - one of the five markings options is for F-K Müller's 'red 2', the 1./NJGr 10 Moskito hunter flown by the ace during July-August 1944. I'd already written about this machine on my Luftwaffe blog and was invited to submit a lengthier appraisal for the latest Eduard INFO.

My 'history' feature on Müller's aircraft and night fighter career complete with rare photos and first person accounts is available to read in the free 76-page November issue of Eduard Info - download it here


...now to get some modelling done..


Friday 26 July 2019

48th scale Merlin-engined P-51 Mustangs


The count down to the US Nationals and the release of the 'kit of the year 2019' is on. I'm referring of course to the Eduard P-51. So how many are you looking to add to the stash? If any ? Surely any modeller worth his salt already has a large number of P-51s to build?  Here's a look at some of the 48th scale Mustangs in my stash.


The most recent is the new-tool Airfix P-51D and it certainly appears to build up into a fine model. Here's my friend Bob's build (East Kent Scale modellers)


The P-51 B/C kits by Accurate Miniatures, Tamiya, and Pro-Modeler (Monogram/Revell) are apparently very similar, although the Pro-Modeler one is the most accurate out of the box according to Detail and Scale Mustang vol.1, which covers Mustang variants from prototype to P-51 C. Nowadays, this is probably also the hardest one to find. Of course the Tamiya is reputed to have the best fit of all the kits - indeed it's probably one of the best fitting kits ever. For the P-51 D, the Tamiya and Hasegawa kits are also supposed to be very comparable.


Above; the Hasegawa 'D' looks great in the box with a super level of detail in the cockpit and in the selection of underwing stores. The Tamiya kit has one major advantage over the Hasegawa kit - the separate flaps, which are usually seen 'dropped' on shut-down. Their B/C kit also has separate flaps, unlike the Pro-Modeler and AM kits. However the cockpit floor of the Tamiya P-51 B is probably inaccurate, all Merlin engined P-51's had a flat plywood floor, not metal as in the Tamiya kit.The ICM versions look as good as the Tamiya kits that they may have been 'developed' from, with perhaps not quite such a good fit of parts.

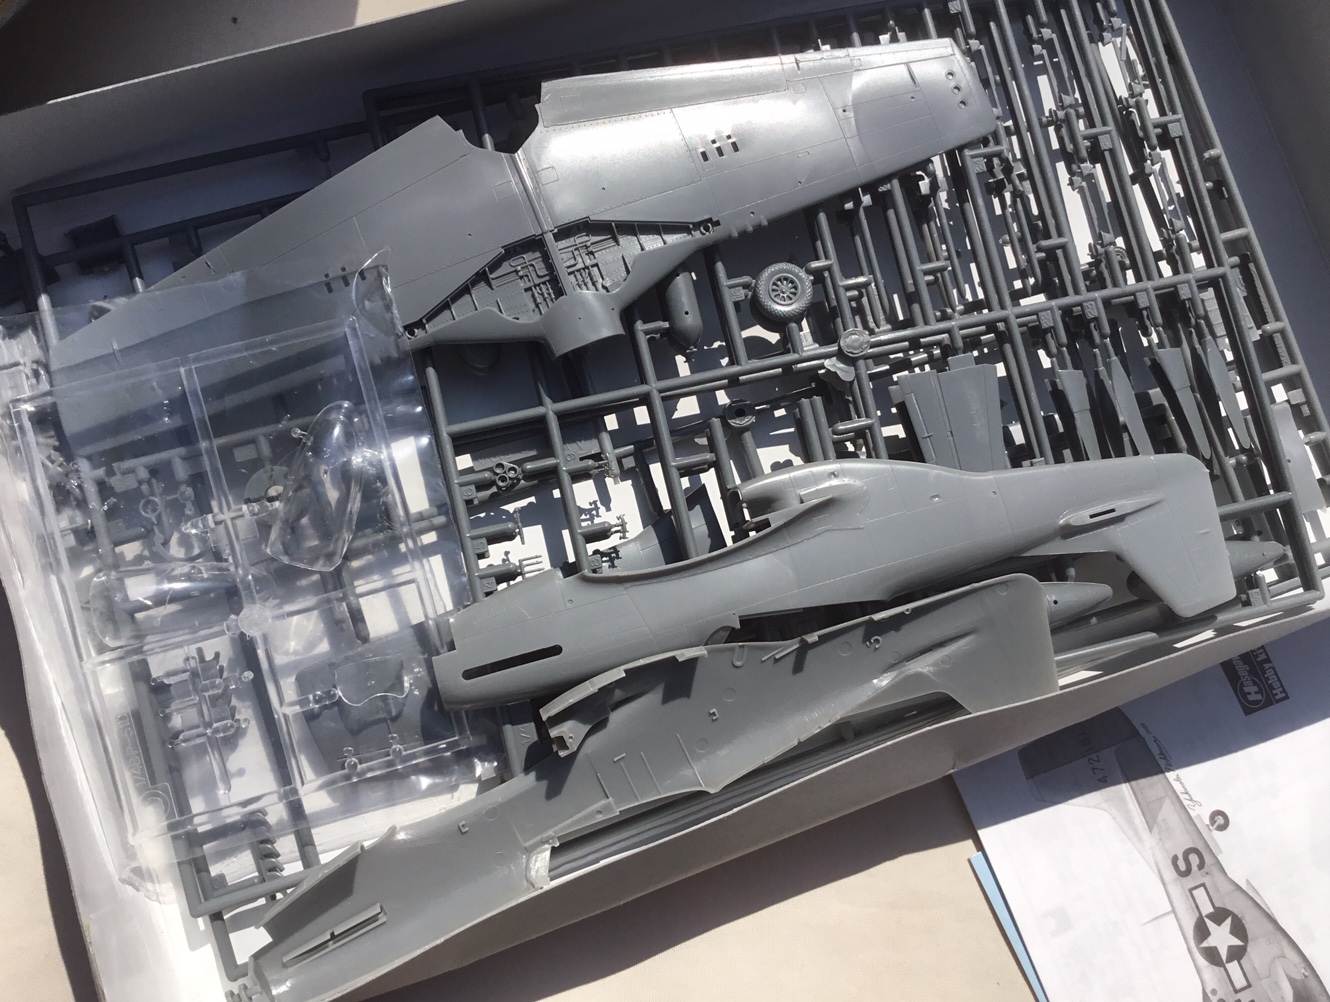
Below; Patrick Chung's beautiful Tamiya 'B'


As I guess is well-known, all the kits of the P-51B/C/D/K in 1/48 scale have their wheel wells boxed in, whereas Merlin-engined P-51s featured no well as such -  the wing spar running straight through the wing essentially comprised the well, so in this regard all 48th scale kits are incorrect, but to be honest this is not the sort of thing that worries me as modeller. Although I do have a resin Aires 'bay' in the stash (below) The Hasegawa P-51D/K has very shallow wheel wells (this can be hidden by modelling the aircraft with the undercarriage doors closed).


Also in the pic above; a long out-of-print Jaguar P-51 B detail set, Ultracast propeller and spinner, Aires corrected undercarriage bay and Ultracast corrected flaps and wheels..

Although it is often said that the Tamiya P-51D is an easy build, the assembly of the canopy can be tricky consisting of a frame to which the glazing is attached. I use either a spare Hasegawa canopy or a Squadron vac form canopy (the Hasegawa canopy is slightly wide when compared to the Tamiya fuselage).

Although the flaps and inner wheel well doors fell as the hydraulic system lost pressure I would not get too hung up (excuse the pun) as your model could represent the aircraft just after shut down.  It is easy to find photo's of Merlin P-51's with the wheel well doors just cracked open and the flaps up.

Bearing in mind that I don't have the Fujimi, Meng or Academy or even the Accurate Miniatures kits, my recommendations for an OOB build would probably be the new Airfix tool - I'm starting one of mine as soon as - and the Hasegawa P-51 D. The Hasegawa D contains more under wing stores than the Tamiya kit and appears - in my opinion- to feature better detail.


Below;

".. when Revell re released the old ICM kit (we all know that this is rather similar to other 1/48th P-51 B kits!) with the markings for AK-A I just had to buy it and here it is.."

Tony O'Toole


Tuesday 16 July 2019

Airfix new-tool 72nd Tiger Moth - build review finished (3)


Tiger Moth new-tool build review is finished. This is another neat new-tool from Airfix. A very nice production. Airfix have achieved the' impossible' here in my book - making a 72nd biplane kit that can be easily built by a (more or less) biplane novice (only the third I've completed on this blog..). In fact the top wing sits nicely in place on just the cabane struts alone, while the interplane struts fit perfectly, alignment  and 'forward lean' guaranteed. I decided in the end to turn the elevators 'up' rather than have them droop and the rudder has been cut out and angled to the left. Note the fin does not sit flush on the fuselage on the real machine, being slightly raised at one end. Rigging - well, I'll do better next time. I've not attempted to replicate the tail plane control cables which run alongside the fuselage, less is definitely more in this scale. I'm not Mike Grant anyway, that's my excuse, so not too many close-ups. I definitely think I might do more of these - although at a tenner a throw you don't really get a lot of plastic for your money. While I've still got my eye sight I fancy an 8th AF hack to display alongside some P-51s


Below, Tiger Moth as seen at the Aero Legends Battle of Britain show at Headcorn, Kent during July and below that,  XL 717 in 1962 in Scotland from an Air Britain photo and subject of the Airfix kit in this latest release.


Saturday 13 July 2019

Rigging the Airfix 72nd scale Tiger Moth - build review (2)


..or should that read 'attempting' to rig the 72nd scale Airfx Tiger Moth. It is not the first biplane I've 'rigged', but it is the first time I've used EZ Line to any great extent - the 'easy' option would be something a little less elastic, possibly even stretched sprue. Here I've used EZ line (fine), super glue, accelerator and some thin pointed tweezers - and made a bit of a pig's ear of it. Ideally I needed a second pair of hands. It didn't prove possible to fit the rigging before putting the top wing on - the interplane struts are simply too precarious to secure the thread to. The 'pros' do all sorts of fancy stuff - like drilling right through the wing and pulling the thread through. I managed to snap several 'wires' doing this. I desperately need a fool-proof method of accurately applying a small amount of glue too - too large a 'blob' and the paint work is ruined  - as here. Nothing that a few touch-ups can't hide though..not every wire is replicated of course and in the end I was reasonably happy with what I'd managed to achieve. Sometimes I think that this is the whole point of this hobby -  to take pleasure in the 'process' and to enjoy the sense of achievement when 'completing' a new task...


Friday 12 July 2019

"highly detailed and accurate model built for sale " - built models sold on Ebay


There are a fair amount of built models offered for 'sale and display' on ebay. I'm not sure I could ever part with some of mine like that but there are plenty of people who have no qualms about offering their latest 'creations' for sale.  At first sight this one is neatly finished for example;

  " ..A beautifully finished 1/72 scale model of the Focke Wulf FW 190 A-4 as flown Maj. Walter Dahl, Stab/JG 300, Jüterbog, Germany, December 1944 with some light weathering to depict in service use..."

"...its built to a high standard.... Guns are realistically hollow and the propeller rotates by simply blowing gently on it!..Compare this to many others with crude finishes and poor paintwork currently on eBay...."


Unlike this guy I feel a little uncomfortable about criticising the work of other modellers. But, well, I can't help but point out that this is the Zvesda snap-fit Fw 190 A-4 kit as the modeller acknowledges himself. Walter Dahl was of course NOT flying an A-4 in December 1944  but an A-8 with the bulged cowl MG cover (..larger calibre guns of course....) and with the fuselage extension of the later Fw 190 variants. ( I guess we won't mention the absence of the outer wing MGs, the upper wing bulges, the grossly over-scale head armour and support, the 'unpainted' cooling gills of the BMW radial etc etc..).

Of course as an Experte (note spelling and capital letter..) I can't help but 'whine' about details like this. And while the model sales pitch above could be seen as no more 'accurate' than plenty of others out there on ebay the model sold for £99 ! ....so good luck to him I guess. And here's one of those examples referred to above...which incidentally is posted up by Ebay at the bottom of the 'Dahl' modeller's own auction! ..That must be irksome! At least the write-up tells it like it is ...


"...A 1/72 scale assembled painted model of a Focke-Wulf 190 aircraft...

Assembly has imperfections, a ridge along the fuselage joint, some glue marks, undercarriage is off upright. The prop turns and is a loose fit. Paintwork has some marks on the underside.

Except for the central bomb, the aircraft appears to be complete, although some smaller details may be snapped off/not present...."


My own build of the Zvezda Fw 190 A-4 'snap-fit' kit is here

Sunday 7 July 2019

British Airways Boeing 747 in BOAC livery


As part of British Airways 100 years centenary one of the current 32 strong fleet of 747-400s, reg G-BYGC, is painted in BOAC colours. Another one is painted in the Landor scheme, a third one in the Negus scheme. All three will remain in these colours until retirement in 2023/24.


" ..Monday February 18, 2019 – Large crowds gathered at Heathrow today to watch the much-anticipated arrival of a British Airways Boeing 747 painted in the iconic design of its predecessor British Overseas Airways Corporation (BOAC).

The aircraft entered the IAC paint bay at Dublin Airport on February 5 where it was stripped of its current British Airways Chatham Dockyard design before being repainted with the BOAC livery which adorned the BOAC fleet between 1964 and 1974.
.."


  The BOAC-liveried Boeing 747 model and photos are by Tom Weir (shown here with Tom's permission). The kit is the original 1/144 Airfix 747 BOAC boxing with Two Six Decals BOAC 747 silk decals. Below, the real machine  - or almost. G-BYGC is a -400 variant with the extended upper deck. Photo taken on 12 June 2019 on a wet ramp at London Heathrow Terminal 5 prior to operating BA 243 to Mexico City - my son's last B747 flight prior to converting to the A350.


Monday 1 July 2019

Airfix new 72nd Tiger Moth - build review


A quick build before moving on to bigger and more complicated projects. The Tiger Moth isn't a large aircraft so after a few hours in the garden this is almost ready for painting and decaling, which, as with most biplane kits- or so I'm led to believe -will have to be undertaken before fitting the top wing. Here the cockpit 'doors' have been cut away and the rear fuselage has been cut out to fit the anti-spin strakes. Inside the fuselage halves framing and controls are molded onto the side walls. Two instrument panels with decals are provided. The only area of poor fit has been the lower wing to the fuselage but the assembly is such that the correct dihedral is ensured. The elevators and rudder have been cut out and deployed as is usual for a machine at rest. One area which had me scratching my head was the fit of the tail fin - no, it doesn't sit level on the fuselage on the real aircraft either! Not that I knew that even having an example of the aircraft to 'study' locally  - G-ACDC seen at Postling Farm airfield, Kent, (below) is one of the oldest machines still flying apparently..


Wednesday 26 June 2019

Eduard Fokker Dr.1 48th - build review finished


Official Kogenluft photo taken at Léchelle, France in late March/Early April 1918 records at least 13 Triplanes of Jastas 6 and 11 (JG I) at the height of the great Offensive. Alex Imrie stated, "During the advance which resulted from the Spring Offensive, JG I occupied the British aerodrome at Léchelle on the evening of 26 March. This photo of Jasta 6 Triplanes lined up there was probably taken a few days later, and shows the aircraft undergoing national insignia changes." There are both Iron Cross (Eisernes Kreuz) and Balkenkreuz markings on view in this image but all the rudders featuring the newly-applied Balkenkreuz are white. Just beyond the fellow with the binoculars, beyond a two-seater DFW C.V hack machine marked with the number '3', can be seen the red-painted top wing of Richthofen's 425/17 partially obscured by another Triplane - in front of the last of the Bessoneau hangars. The Dr. 1 of Jasta 11 ace Hans Weiss Dr. 1 (545/17) is somewhere on this image...Click to view large..


Completed in the markings of Jasta 11 ace Hans Weiss Dr. 1 545/17 (WNr. 2213 seen on lower rudder). As the name implies much of his machine was painted white.


The Eduard Dr. 1 kit is nicely detailed and I used some of the etch from the ProfiPACK box in the stash to enhance the cockpit (compass etc). The plastic control yoke in the kit is nicely done- on the etch sheet you will find some tiny 'L' and 'R' placards for the MGs ( 'left' and 'right' in German is 'links' and 'rechts'). The fuel tank air pressure hand pump for the right side of the cockpit was scratched..The back of the aluminum seat was evidently covered in fabric on the inner face and the seat cushion was the parachute pack. The alu ammunition boxes don't sit very well in the forward fuselage and needed trimming. Everything lines up well though with the Spandaus which really need the etch jackets of course. Eduard's etch includes the Bowden cable arrangement that operated the triggers on the real machine. The fuel gauge on the upper deck cowling has an etch dial face. As noted previously, aligning the wings proved problematic - on my next build I will do more to ensure that the lower wing sits 'square' in the lower fuselage. The underbelly fuselage seam is fixed with an etch stitching strip and the seam under the forward fuselage can be hidden as I did here with an etch plate which helps secure the very fragile front landing gear legs so there is an even placement of the whole undercarriage - something else I found pretty tricky to achieve. One thing I didn't do on my model was 'fix' the clear inspection window in the top wing which needs to be relocated and the raised edges sanded down. Next time... There are two propeller types offered in the kit - Axial and Heine. Painting a 'laminated' propeller is fairly straight forward - I simply gave the item a coat of “buff” or linen and when dry, streaked some burnt umber oil over the part with a stiff brush. You could mask the prop off in strips. I used a similar technique for the wings with '502 Abteilung' Olive green oil paint. Eduard's etch sheet for the Dr.1 includes the "Reich” / government ownership plate located on the starboard side of the cowling. I did some minimal rigging with E-Z Line which I always find difficult to work with as it is so 'elastic'.  Thanks to Stephen T. Lawson for help with this build!


 The first victory recorded in a Fokker Triplane was achieved by Rittmeister Manfred von Richthofen when he brought down an RE 8 on the morning of 1 September 1917 for his 60th victory in his first combat flight in the type. (Kranzhof states 2 September). The crew believed the oncoming machine to be a British Sopwith Triplane. Poor construction and the proximity of the top wing to the propeller wash subsequently caused a number of well-documented failures in-flight. The type was temporarily withdrawn to re-appear in strength in January 1918. The Fokker Triplane equipped most of the Jagdstaffeln of the three Jagdgeschwader of the German Fliegertruppe during the first half of 1918.


Incidentally, the word Jagdgeschwader translates as 'fighter wing' or 'fighter wings' - there is NO plural form of this word in German, unless the sentence construction in the German involves a dative case. There is no 's' and certainly no 'n' at the end of the word in its nominative form! One of my pet 'hates' when reading works by authors who don't really know German - even vanWyngarden does this, although in every other respect I find his work to be exceptional. Shame that Osprey have stated that it doesn't sell well and that apparently there will be no more..