Showing posts with label Fleet Air Arm and naval aircraft. Show all posts

Monday, 4 August 2025

Airfix new tool 1:48th Gannet COD 4


Dick from East Kent Scale Modellers has done a brilliant job on the new Airfix Gannet COD 'carrier delivery' aircraft. What a beast, looks magnificent in 48th!


Another view and a comparison with the Classic Airframes kit. This older kit has a noticeably smaller prop assembly and a rather 'pinched' forward fuselage..note my Land Rover and Dick's Heller Austin Allegro also on the table..


Tuesday, 15 April 2025

DBMK (DB Model Kits) 1:32 Sea Fury test shot builds


Colleagues at East Kent Scale modellers have been fortunate enough to have been given the chance to build this new 'super-kit' due out later this year by new company DBMK. Their efforts were on show and up for discussion at our latest club night last week, held as usual as the RAF Manston history museum. Both Bill and Dick who constructed these two were working without instructions. Dick built his unpainted. We've mentioned DBMK before on this blog as they have a number of new kits in preparation including a 1:48 Scimitar..


And the Dutch Sea Fury built from the kit by Rod as displayed at Telford IPMS SMW 2025

Wednesday, 10 April 2024

East Kent Scale modellers club night 09 April - an impromptu 899 NAS line-up


After missing a couple of meetings thanks to other stuff it was nice to get up to RAF Manston and the history museum cafe/canteen for the monthly club meet of East Kent Scale modellers. As usual some fantastic models on display and plenty of model 'chat' and  'advice' and tips being dispensed ..

Dave's Skyhawk and Mitsubishi T-2


Callum's GwH 1:144 TSR 2


Dick's Airfix Sea Vixen in a line-up  of 899 Sqd machines...


Two of Rod's WnW masterpieces, a DH 2 and a naval Camel..


Peter's HPH 32nd scale SG 38 glider (partially built) and Dick's Special Hobby DFS 230 


Robert's Italeri 72nd Ju 188. Re-scribed panel lines and a neat finish..


Dick's Arma Hobby Hurricane. Lovely kit, decals apparently "a pain.."


The end of the 899 NAS line-up featured Bill's Hunter T8M. XL603 was one of two Hunter T8M conversions operated by 899 Squadron as radar trainers, fitted with the Blue Fox radar..


this is Henry's 32nd Hasegawa Raiden ('Jack')


Harrier trainers from the Kinetic kit by Dick and Bill..


Stu's Airfix Meteor in 72nd. Lots of great comments on his super metallic finish - Tamiya


Monday, 22 May 2023

US naval fighters of the 50s by Peter Booth


.. 


A neat line-up of 50s fighters by Peter Booth comprising the Hasegawa Cougar, Tiger and Crusader, Fujimi Cutlass, Emhar Demon and Tamiya Skyray. All in 1/72 and pretty ancient kits painted in Xtracrylic light gull gray and white.

Wednesday, 8 December 2021

LIDARing the Supermarine Scimitar - new DBMK Models kit due in October 2023


Will Packard of DBK Models discusses the Scimitar for a FB video filmed during the scanning of the rare Solent Sky museum example of the type at its 'secret' location in Hampshire ahead of a new kit release planned for late 2023!  


From Steve Bond's " Fleet Air Arm Boys " (Grub Street)


"..the Scimitar was a real 'hot rod' for its day ..but was quite heavy and had only small wings. It was big; the biggest single-seat aircraft operating from a carrier at that time and the last FAA machine with guns, four 30 mm cannon. It could carry four 1000 lb bombs and had a nuclear capability. Its two engines produced 23 000 Ibs of thrust which made for a very spritely acceleration....of the two types I was flying at the time, the Scimitar had the power whereas the Hunter had the manoeuvrability. But if the Scimitar was getting into trouble he could just open the throttles and disappear... we intercepted an American task force about 400 miles east of Iceland. An F-4 attempted to interfere with us, but it was no contest. Then an F-8 tried his luck but the US military was not trained in air combat manoeuvring while we were very aggressive..."


below; Supermarine Scimitar - XD 236 seen during early June 1968. This machine was lost the same month on June 26, 1968 flying into high ground in cloud on St Catherines Down, Isle of Wight killing the pilot, Naval Airman 1st class Tony Patton. Patton's radio altimeter failed in bad weather. He was flying a sortie as a target for HMS Corrunna. Adrian Balch photo


Also on this blog; 


Tuesday, 9 November 2021

Building the Airfix 72nd Swordfish with NO filler ! - finished


"some modelling skills required.."    This kit is not an especially difficult build but it does require care and patience - in fact it is a kit that once finished you can take a certain amount of pride in. I think it looks every inch a Swordfish and its pretty nicely detailed too. But I also know better modellers than me that have not managed to complete it - a bit tricky, too fiddly, impossibly large sprue gates making removal of the smallest parts rather awkward and short-shot struts for the wing centre section around which the entire wing assembly hinges. Plus not reading stage 44 of the instructions correctly - gear leg assembly!  Probably not a good idea either to do what I did and start rigging before having completed the assembly - tends to pull the wings out of alignment. And careful not to apply too much pressure on the wings during assembly otherwise you'll snap the struts!


..and for anyone trying to research colours for a 'Channel Dash' Swordfish, well, no one knows for sure, as there are no known photos. The Airfix box artwork features a machine finished in black distemper. All the photos I've ever seen show the distemper applied only to the undersurfaces of the Swordfish and Sky-Grey areas of the fuselage (or in this case Sky as they were Blackburn built). Note that nearly all profiles and kit artwork get the depiction of the codes wrong on both 825 Bismarck and 825 Channel Dash Swordfish. Codes were carried on the fin 1941-1942, not on the fuselage. The colour of the single letter codes was either black or dark red (it's not possible to be certain on the basis of available photos). The colour scheme as featured on the Xtradecal sheet is there or thereabouts, more or less...


Wednesday, 3 November 2021

Building ( & rigging) the Airfix Swordfish in 72nd scale (3)


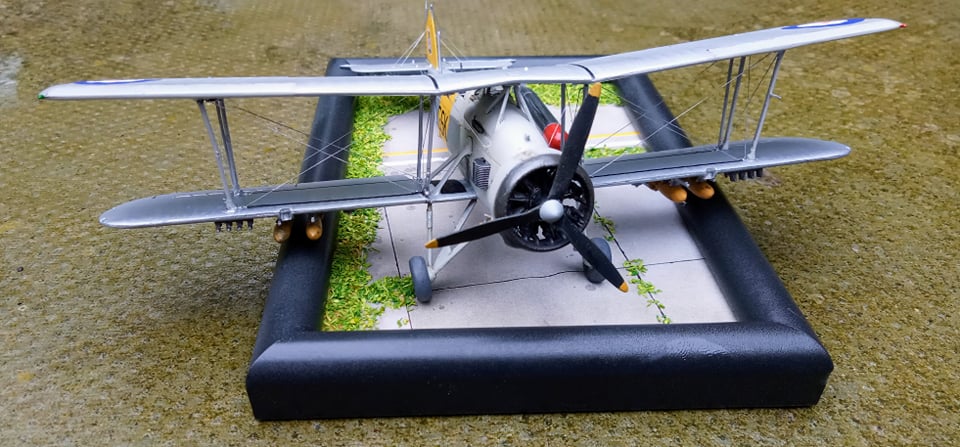
..several disasters along the way - including snapping the outboard struts when cementing the wings as I squeezed them together. At that point the model nearly ended up in the bin. Too distraught to take a pic. But with a touch of super glue, repairs were quickly made. And so the Swordfish is nearly finished. 

Rigging!

I'm gradually getting the hang of this in 72nd scale - my third rigged biplane on this blog (in 11 years of posting) so I'm now feeling confident enough to provide a quick guide;

- drill locating holes with pin drill or similar in the wings/cowl/tailplane pre-assembly

- using a pin (drill) or similar apply viscous super glue to the hole and using pointed tweezers hold a length of nylon thread until the glue 'grabs' it.  Apply 'accelerator' with a thin brush to the area to speed up this part of the process. Ideally the model should be held in a clamp or similar, but I've always managed without one of these.

- if there's one tip to pass on here, it is always glue 'down'  - inverting the model for the top wings, or better, 'rigging' the lower half of the top wing during construction. The thread then hangs down towards the lower wing, so you are not competing with 'gravity' when glueing. Similarly, don't cut the thread too short - too much 'tension' and the thread won't grip as easily of course....


Tuesday, 2 November 2021

Building the Airfix Swordfish in 72nd scale with NO filler - build review (2)


Moving quickly along. The characteristic large bracing struts have gone in and the fit here is very good, they just click into place. The cowling assembles easily enough too and the engine fits neatly inside it and pushes into the front of the fuselage. 

But just when you think the build is going swimmingly you hit the landing gear struts. The pins on these appear not to fit all the way into the locating holes in the wing stubs. This may be intentional as they represent the undercarriage bars which are covered in a fairing, the fairing is not flush with the fuselage and the round bars are visible. Also at first sight they appear to be the only support for the lower wings so getting this bit right is going to be important. Note too that the frame part of the inner struts locates into the wing stub parts - when and if you've drilled/cut out the slot! 


Here I've drilled out those locating holes and inserted the leg strut which locates very poorly into the twin strut supporting the wheel and left everything to dry. 

Things are starting to go awry! I know I've located the strut incorrectly because I can no longer fit the inner strut frame into the wing stub! I tried to pull it out - but of course I'd used superglue. In the end I've cut through the bottom of the strut frame. And probably got a better supporting join for the lower wing outer section. Here's hoping!


As for the rigging, Airfix give no information which is a shame. A kind soul over on the BM  forum posted the rigging diagram provided by SBS in their etch rigging set - or some of it at least. Could be useful..


Monday, 25 October 2021

How to build the Airfix Swordfish in 72nd scale with NO filler ! - build review (1)

..Was going to write 'new-tool' ..but this kit was released in 2012! Now, one of the (largely unstated) aims of this blog is to build as many of the 'new' Airfix tools as possible and I really should have attempted this one before now. As it happens our club is embarking on a 'Channel Dash' diorama for next year's 80th anniversary so now is as good a time as any. 


First query - interior colours.

 The instructions say the cockpit should be H61 'flesh' - I guess that means varnished wood. Not quite. Interior visible fabric should be dark reddish-brown, " the colour of tautening dope.." according to friend Bob who had a long career as ground crew in the RAF. The flash has somewhat 'lightened' the reddish colour in the shot below. Not much is visible anyway.


Having read a number of other build reviews out there it seems that joining the fuselage halves might be a little tricky. I noticed a similar issue and a possible solution on the recent Spitfire Vc - glue the fuselage halves together first and insert the cockpit from underneath when you get to this stage. For the best join of the fuselage halves I glued the forward fuselage first, inserting the cockpit from below when dry, prior to sealing up the rear of the fuselage. This worked well..no filler required on the fuselage anywhere, unlike just about every other build out there on the net..


Given that  I always make a mess of the paint finish when rigging, I decided to rig as much as possible prior to painting. This is relatively straight forward for the tail feathers. Note that the rear fuselage machine gun trough section required no filler - unlike most other builds I've seen. The trough part fits into a u shaped slot in the rear bulkhead of the interior framework, but thanks to my method of joining the fuselage halves, there were no gaps! Note clear parts masked off on the lower forward fuselage  -before fitting wing struts as you won't easily be able to access them.


Some other points I've noted.. the fit for the wing 'stubs' is tricky. You need to push hard, but they do go into the small slot. In stage 14 you have to cut out a locating slot in parts 9C and 10C for wings deployed mode - for locating the struts in stage 44 ! ...which I failed to do. My fuselage centre section struts, parts 1B and 2B were 'short shots' making stage 19 particularly difficult! The insert section didn't fit into the upper wing centre section anyway! Part 7A locates into the front of the windscreen for stages 47 and 48. Looks obvious... after its been pointed out! Finally - for now - the support struts for the horizontal stabiliser attach via a unit which inserts beneath the tail. The fit here is poor and will need filling as do the gaps at the front of the fin on the top of the stabiliser, visible in the image below.


Monday, 23 August 2021

Buccaneer S Mk.2 B XV 352 cockpit


..John Hume, owner of XV 352, working on the Buccaneer cockpit electrics today at the RAF Manston history museum. Here John has just finished installing a 'new' Tag Heuer stopwatch on the right-hand side of the coaming - quite an expensive little item, but typical of the fantastic attention to detail in what John says is the 'best and most detailed' Buccaneer cockpit in the UK. A little 'reference' for builders of the new-tool Airfix Buccaneer including a closer view of the ejection seat..

All hands on deck to get the display exhibits ready for Saturday's RAF Manston history museum post-Covid re-opening...


More on Desert Storm veteran XV 352 on my 'Jet & Prop' blog here