Thursday, 23 April 2015

new-tool Airifx Spitfire Mk I 1:48th scale build review (part 2)


..assembling the cockpit and fuselage on my first new-tool Spitfire Mk 1.. So far so good. Lovely kit, no real problems with fit - just a couple of parts snapped where the large sprue flexes. A bit of fettling is required to get the frames (?) to 'sit' properly in the tub. I don't think the instructions are explicit enough in some areas. The cockpit walls (C1/C2) are not meant to fit 100% flush to the fuselage bulkhead (C52) as they 'overlap' to then lock into the fuselage halves, but no- where is that indicated. Bit of trial and error there. Note the pilot's door can be easily cut out - the open door is supplied as a separate part and there are a choice of forward cowls with reinforced frame mount -or not - depending on the variant being built.


..cutting out the gun bay covers, both upper and lower wing surfaces.


Sunday, 19 April 2015

new-tool Airifx Spitfire Mk I 1:48th scale build review (part 1)


..another new tool from Airfix, Battle of Britain Spitfire Mk I in 48th scale - lovely kit with lots of options.  There are three different props and canopies, optional cockpit side walls and separate cockpit entrance doors. In addition you'll find both types of undercarriage pump, different gun sights, regulators and even armour plate fits. Excellent early exhausts are also provided. Its possible to build an accurate representation of almost any Mk1 from this kit, including pre-war minus the cockpit armour. The striking box art depicts the 602 Sqn a/c LD* G flown by PO Osgood Villiers Hanbury who shot down his first Dornier on 15 September 1940. A local Kent boy as well, attending boarding school in Broadstairs before Eton and study periods in France and Germany before a job in a City with Shell, where he made the acquaintance of one Douglas Bader as detailed in Roderick-Jones nice Grub St. bio " Pedro.."

.. another nice sunny day in the garden so this is the result of an afternoon's work. Note the rather nice instrument panel (decal), which compares very favourably with some Eduard pre-painted etch. You can click on the images for a closer view.


Monday, 16 March 2015

new-tool Airfix Boulton Paul Defiant in 1:72nd scale build review - finished


A few shots of my finished Defiant  night fighter using my phone camera.The model represents an RAF 151 Sq machine as seen early in February 1941 at RAF Wittering. Pretty pleased with the way the model turned out..the 'Night' finish I achieved more by good fortune than planning - Humbrol 33 on its own looks a bit too 'black' so I 'misted' some schwarzgrau 66 and then some light grey over the airframe until I was reasonably happy with the effect! An overspray of Windsor and Newton Galeria matt varnish really helps achieve that typical 'sooty' Defiant nightfighter look..

This new tool is another neat Airfix kit with no particular problems and plenty of detail. Scroll down the page for the build log. All the major components go together without any difficulty - the cockpit fits into the fuselage perfectly, although beware to get all the bulkheads aligned correctly as tolerances are tight. The wing root and undercarriage fit is perfect. The placement of the undercarriage doors is a little vague though and the head armour needs filing down a little to enable the canopy to sit over it properly. The decals are very good, but one of my serials rolled up on me; fortunately I bought two kits and am about to finish the second in the day fighter Battle of Britain scheme..


Saturday, 14 March 2015

new-tool Airfix Boulton Paul Defiant in 1:72nd scale build review (3)


" ....All things considered the Airfix Defiant is the best all round kit I've seen in this scale..."
 " ..Apparently the new one is even better. LOL.."

.. the first of my two coming along nicely - canopy and turret framing a real chore though! that, and trying to get a decent finish in black..here I've gone over the black with some schwartzgrau 66 to give it a little faded and worn look..three or four different canopy options on the sprue as well..


left ; gear on and drying; gear door fit/location is a little haphazard. The small curved triangular lumps at the front of the door are the hinges and can be clearly seen in the front view of the Hendon machine in the first Defiant post below..scroll down


...the (phone) camera flash makes the streaky effects I've added to break up the solid black look a little stark; hopefully should look okay-ish under a coat of varnish


Thursday, 26 February 2015

new-tool Airfix Boulton Paul Defiant in 1:72nd scale build review - part 2


cockpit is reasonably detailed including stick, rudder pedals and a coloured decal for the instrument panel, The wheel well insert is nicely detailed too.  All I've done here is added some foil belts. I have acquired an Airwaves etch set designed for the 'old' Defiant, but see no need to use it here. Parts fit well, no filing or fettling required. I'll probably need a smidge of filler along the wing root and just under the nose at the wing join..Next job will be to cut out the wingtip lights and replace with a lump of clear sprue sanded to shape and probably add from sprue or wire the prominent bracing struts behind the pilot's head armour. Not much else to report..


Monday, 23 February 2015

new-tool Airfix Boulton Paul Defiant in 1:72nd scale build review reference pics - part 1


A few days off to restore the 'mojo' and make a start on a couple of the new Airfix Defiants. The Defiant holds a unique place in the history of the RAF being the only 'turret' fighter to see service. The 'old' Airfix Defiant must have sold thousands over the years but is a pretty dreadful and rather elderly kit, with its misshapen nose, short tail and generally poor fit of parts.


The new-tool Defiant from Airfix (main sprues above top) seems to have captured the imaginations of many modellers on this side of the pond..the kit presents lots of options - open/closed canopies, rear fuselage decking raised or lowered etc - and is well detailed and molded. Panel lines are engraved and not too deep. I've made a start on the nicely detailed cockpit, above, although in reality the aperture is so small not much will be seen..Elsewhere Rob 'basic modeller' has a concise and pretty neat review of what's in the box which you can view here - just one click ..


References for the build are pretty thin on the ground, although Alec Brew's Crowood title "Turret Fighters" and the Mushroom 'Defiant' books are well worth hunting down for this build. Here I've grabbed some stills from a wartime training film and the video is also available to watch here with a single click.


There have been a good number of questions concerning internal colours and turret details for example. For example, the turret framing appears to be in black even on the camouflaged DE/DG Defiants. Only the base of the turret appears to have received any camouflage although even here that is not obviously evident. Photographic evidence (such as it is) indicates early Defiants had aluminium painted wheel wells with the insides of the doors (and the undercarriage legs) being either night or white depending on the lower surfaces colours. There are indications that the door colour carried over when the undersides were repainted Sky.

There is some suggestion that the wells should in theory be some sort of internal green colour, while a number of images show the insides of gear doors to be black. Note the black upper gear legs and actuators in the images below. The lower unsprung portion of the undercarriage would be aluminium, as would the wheel hubs. The RAF Museum Hendon example featured a totally black finish on every part of the airframe - as seen in the walkaround pics in the Mushroom Defiant publication - but was almost certainly over-sprayed at some point in the past while being prepared for display. Following a two year repaint and restoration, certain details - such as the gear legs - have been restored and repainted to what one assumes was their original configuration. A brief look at the Hendon machine in a short walkaround vid. A single click to view here..


Tuesday, 20 January 2015

new tool 1:72nd Revell F4U Corsair - build review


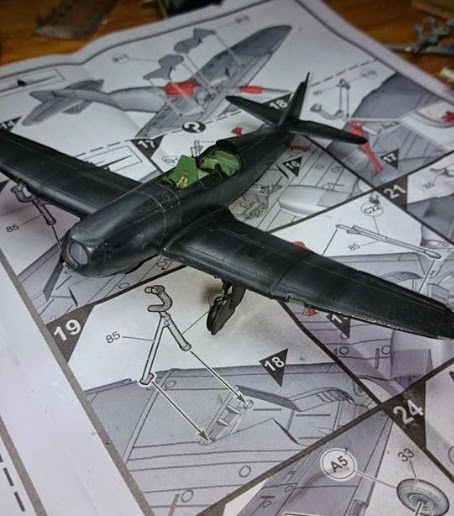
...so following a pretty ordinary if not downright disappointing 2014 (in modelling terms) this is my first build of 2015- the new-tool Revell FU-1 Corsair. I was really looking forward to this kit, but, oh my, that terrible white plastic!

 first up, the plus points; fine surface detail, a detailed engine / cowling and cockpit, nice decals, a semi-reasonable fit and a sensible price tag. Negatives; unfortunately the kit has the two inner wing pylons of the F4U-1D, not the centre line pylon of the F4U-1A. There is a tear-drop shaped recess in the rear of the oil cooler inserts to take the pylons which are a little tricky to fill. The propeller blades have a 'cricket bat' shaped profile, instead of a 'baseball-bat' shape. I've seen some comments about fuselage length issues; compared especially to the plans in the Detail and Scale books.


  The build is a little tricky in some areas - 9 parts for the wing and some awkward joins are the result. Also the wingtip joint forms the outer edge of the aileron hinge. The cowling ring match up with the two cowling sides is a little tricky too, leading to some more filling and sanding. The main gear has no positive placement for the strut support which was a problem, particularly as these are added 'blind' with the wings together. I could not find a position in which, when they were mated with the gear legs, gave the correct 90 degree alignment for the latter.

 As I said above, a pretty ordinary kit, which was a little disappointing. Even if you aren't really worried by any potential shape issues - it certainly looks like a Corsair - a straight-forward build would have been nice. This certainly isn't really one of those. Conversely, the Corsair enthusiast will probably not worry overly if he has to put a bit of care in, but he is likely to be concerned at any possible dimensional inaccuracies. So to some extent  this Revell new-tool falls between two stools a bit. Probably only a 7/10